Add a Water Spigot to Line Easy
When I moved to a rural area, I had to learn how to do my own plumbing. It's proven a truly rewarding (and budget-friendly!) skill.
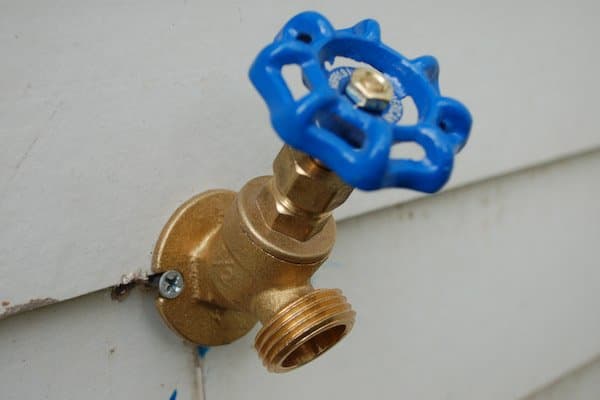
Outdoor Water Spigot.
Watering Line Installation Basics
Plumbing in an outdoor spigot—or a second spigot, if your existing spigot isn't convenient for watering certain areas—is easy if your existing plumbing lines are CPVC (plastic). Just attach the new spigot to an outside wall and run ½" CPVC water pipe to an existing cold-water line.
Plumbing with CPVC is as easy as playing with Tinker Toys. Most fittings are put together with glue. Pipes are easy to cut to the needed lengths using your regular power tools.
Since in most cases water lines run under the floor, the biggest aggravation to putting in a new outdoor spigot is drilling a couple of ¾" holes in the floor. I suggest placing the spigot just above floor level, running a new cold-water line under the floor, and splicing the new cold-water line to the spigot into an existing cold-water line. Preferably, this splice or attachment to an existing cold-water line would be made at the kitchen or bathroom sink, next to the water heater or washing machine, since cold-water lines emerge above the floor at these places.
Where to Connect the New Water Line
The new water line running to the outdoor spigot could actually be spliced into the existing cold water line at any point—bearing in mind, of course, that no cut may be made at any point between the curb/meter and your main shut-off. If you are splicing in the new line (and hence, cutting an existing line) anywhere near the main shut-off, be sure you do it above the main shut-off.
Remember, your home's water service comes from the curb or a meter at the curb. This main water line (the intake) is joined to your home's cold-water line by a special fitting. Immediately after this fitting, there is a main shut-off valve. When closed, the main shut-off shuts off all water to your house. You use this to shut off the water supply from the curb when you need to do work on the plumbing, or in an emergency if a water line breaks. If you cut the line anywhere between the main shut-off and the curb/meter, you will have no way of turning off the resulting geyser of water—except at the meter at the curb, which is likely to require a special tool. You don't want this to happen.
In order to plumb in an outdoor spigot, you will first need to locate your cold water line. Take care to distinguish between the hot-water and the cold-water lines. If your hot and cold water lines are not labeled, this is a good time to label them—or at least the ones you will be working around. A Sharpie works well.
The cold-water line runs the length of your house, branching off to supply cold water, first (normally) to the water heater, and to supply cold water to each of the other plumbing fixtures in your home. It helps to realize that each fixture is supplied by a branch from the main cold-water line.
When you plumb in an outdoor spigot, what you are doing is creating a new branch from the cold-water line.
Can the water line to the spigot be spliced into one of the branches that feed, say, the bathroom or kitchen sink? Sure! In fact, you will find that it is best to splice the new line to the spigot into one of these branches:
- The cold-water line under the bathroom or kitchen sink.
- Next to the water heater or washing machine.
The main reason for joining the new line in a place above the floor is that it will enable you to easily access the shut-off to the spigot line. Like all other plumbing fixtures, the spigot line should have a shut-off valve.
If you splice the spigot line into the cold-water line under the kitchen sink and put a shut-off valve there, you can turn off the water to the spigot in the fall just by reaching into the cabinet under the sink. (No crawling under the house to get to the shut-off.)
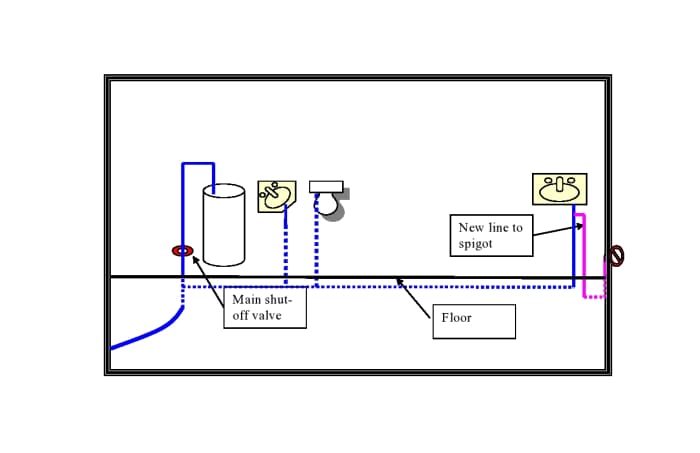
Figure 1
Scroll to Continue
Read More From Dengarden
This diagram shows how the cold water line branches to supply each plumbing fixture. The dotted lines run below the floor. Solid lines show where the cold-water line emerges above the floor. The bright pink lines show possible location for the new cold water line to the spigot.
In this diagram, this new line has been spliced into the cold-water line under the kitchen sink. The dotted pink line shows where the cold-water line to the spigot passes under the floor. Solid pink lines show where the cold-water line to the spigot emerges above the floor: Here, it emerges above the floor under the kitchen sink, where it is spliced into the cold-water line that supplies the kitchen sink. The other end of the cold-water line to the spigot emerges above the floor to pass through the exterior wall to which the outdoor spigot is attached.
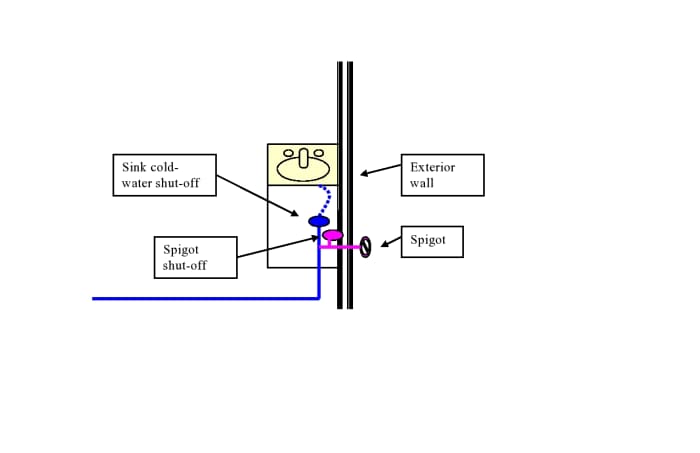
Figure 2
If you are really lucky, and you just happen to need an outdoor spigot in a place where a kitchen or bathroom sink, or the water heater or washing machine is right next to the exterior wall, then the line and fittings shown in pink are literally all you would have to install. No need for the water line to drop below the floor at all, and no need to drill holes in the floor.
But, since few of us have that kind of luck, we will need to cover the more likely scenarios.
Choose the Spigot Location
The first step to planning this project is to decide where you want your new outdoor spigot. Then decide which above-the-floor cold water line is nearest to where you will put your new spigot.
Since I am suggesting that the spigot be attached to an exterior wall just above floor level, you will also want to think about the location of the new spigot from this standpoint. A few inches of plumbing line will be visible inside the house.
You may want to locate the spigot so that the short line that emerges from the floor to pass through the outside wall to the spigot is in an inconspicuous location, such as a closet or laundry room or inside a cabinet. If this isn't possible, given where you want to locate the spigot, you may want to consider boxing it in with small-dimension lumber to conceal it.
This small piece of pipe must pass through the wall about 1 ½"-2" above floor level in order to clear the wall plate. But even if you can't locate this in an inconspicuous spot, this small (about 2") piece of pipe should be barely noticeable in any case.
Running the Water Line Inside the House
It may be possible—or even desirable—not to run this new line under the house, however. Why not run the new water line above the floor, inside the house? One reason, of course, is that a bare water line running along a wall might be unsightly, but it could be concealed by boxing it in with small-dimension lumber. Also, you may be able to live with a short run of an exposed water line in a utility room or closet.
Doing the job this way will make the job much easier; there will be no need to drill holes in the floor, for starters, or to crawl under the house.
It may even be possible to run the new water line inside a closet or cabinet, where it won't be visible.
Actually, some people run all their plumbing lines indoors. It solves many problems: Lines are less likely to freeze inside the house, and when it's time to work on the plumbing, there is no need to crawl under the house to do it. Anyone who lives in a cold climate who has spent much time crawling through puddles of ice-water under the house to fix a broken pipe will immediately see the advantage of being able to do any needed work indoors, where it's warm and dry. Moving all water lines indoors is possible and can help prevent frozen pipes.
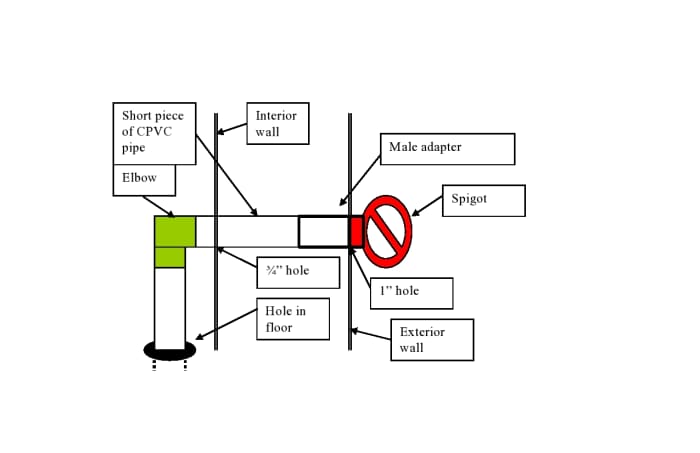
Figure 3
This diagram shows the water line to the spigot passing through the wall to the inside of the house, and then turning to pass through a ¾" hole in the floor. Notice that the short piece of pipe and the elbow are against an interior wall, where they will be visible inside the house.
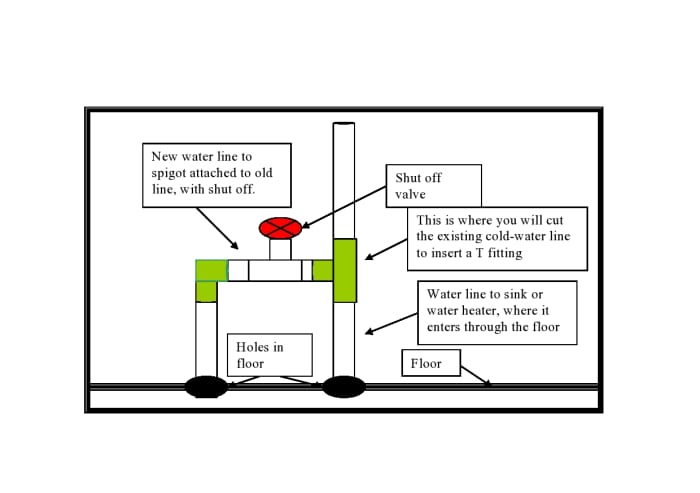
Figure 4
This diagram shows how the new line will be connected to an existing above-the-floor cold-water line. Fittings (one T and one elbow) are shaded green. The shut-off valve will require one male adapter at each end. Notice that you will probably have to drill a new hole in the floor for the line to the spigot to pass through. Drill this hole using your electric drill with a ¾" spade bit.
What You'll Need
The plan here is to use ½" CPVC water lines to plumb in the spigot. If your existing cold-water lines are PVC, then it will be more convenient to do this job with PVC water lines. PVC is often used for cold-water lines, and CPVC for hot-water lines. I prefer to use CPVC for both, but that's just me.
CPVC water lines can be attached to existing copper water lines, but this will require a CPVC to metal transition fittings. This is a subject to discuss with the guys in the plumbing aisle.
The supply list assumes that you are using CPVC lines and fittings for this job. If you plan to use PVC lines and fittings (because your existing cold-water lines are PVC), you can still use this supply list; simply get PVC instead of CPVC.
Water lines are normally ½" lines. When purchasing supplies, it's a good idea to be very careful to make sure that you are getting the right size fittings. When you buy the spigot, go ahead and screw the ½" male adapter into it, to make sure it matches. When you buy the shut-off valve, screw the two male adapters into it, to make sure they match. When purchasing water lines (sticks of CPVC), you might want to insert one end into other fittings, to make sure everything fits. Taking extra care now can save you a return trip to the hardware store. But don't beat yourself up if you do have to make several trips back to the plumbing aisle. This is plumbing. As any plumber can tell you, "Plumbing doesn't happen without cussing."
Supply List
- A spigot intended for half-inch CPVC water lines.
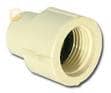
- Since the spigot will have female threads, you will need one male adapter to attach it to the ½" CPVC water line. If you have selected a spigot that has male threads, obviously you will need a female adapter, instead of a male adapter. (See pictures of male and female adapters below.)
- One shut-off valve. The cheap kind is fine, as it will be indoors. The shut-off valve will have female threads at each end, so you will need two male adapters (one for each end) to attach it to ½" CPVC water lines.
- One ¾" spade bit, to drill a hole through the interior wall, and then through the exterior wall.
- One 1" spade bit, to drill a hole through the exterior wall. The reason you are drilling a ¾" hole in the interior wall, is because this is the right size for ½" CPVC pipe. The hole needs to be bigger than ½" because the diameter of CPVC line is a measure of the inside of the line. The full diameter of the line measured from the outside edge is a little more than ½". The reason you are drilling a 1" hole on the outside of the house is because that is the size hole you will need to receive the male adapter, which will be inside the wall. It won't fit through a ¾" hole. Holes drilled through the floor will be made with the ¾" spade bit, since only the ½" line needs to pass through these.
- One or more "sticks" of ½" CPVC water line. Measure the distance the water line must run from where you will splice it into the cold-water line to where the spigot will be located, allowing for a little extra for vertical pieces that must come through the floor, as well as for the possibility that the lines may have to make some unexpected turns.
- Now purchase some CPVC fittings. You will need one T, which you will use to splice the new line into the existing line. If the distance from the splice to the spigot is too long for a single stick of CPVC to make the run, you will need at least one straight coupling to attach two sticks together. Next, decide how many places in the water line will make 90° turns. You will need one elbow (or 90) coupling for each such turn. It is often a good idea to purchase a few extra elbows.
- One can of CPVC primer/cleaner.
- One can of CPVC cement.
- One container of pipe-thread compound. All threaded fittings require pipe-thread compound. This is an important thing to remember when doing plumbing.
- You will need one or more cutting tools for cutting CPVC lines. For cutting new lines—that is, lines that are not already plumbed into a tight space, a skill saw works fine, and a miter saw is especially nice for quickly cutting CPVC sticks to marked lengths.
- You can purchase a special tool for cutting CPVC lines at the hardware store. There are several kinds of such cutting tools, which are useful when cutting existing lines in tight spaces. Such a tool can be used for making all the needed cuts, if you don't own a skill saw or a miter saw. Personally, I use a jigsaw for making cuts to existing lines in tight spaces. You will probably not want to use a jigsaw except in tight spaces, because of the vibration.
- One Sharpie, to mark CPVC pipes for making cuts. A Sharpie can also be used to label the lines you will be working around "hot" or "cold." This will avoid inadvertently plumbing your spigot into a hot-water line, or at least cutting the wrong line. Better safe than sorry!

Male adapter.
Female adapter.
Step-by-Step Guide to Installing an Outdoor Spigot
The simplest way to do this job is to begin at the spigot end of the line and work your way back to the point where the new line will be spliced into an existing line. By beginning at the spigot end, you can complete almost the whole job before you cut into an existing cold-water line—which means you won't have to turn off the water to the house until the job is nearly finished.
While there are many different kinds of spigots, the cheap kind has female threads and requires a male adapter to be screwed into it. (If your spigot has male threads, you will need to use a female adapter.)
- Begin by attaching the male adapter to the spigot, using pipe-thread compound. Always apply pipe thread compound to all threaded fittings. This is what keeps threaded fittings from leaking. I like to use the pasty "liquid" pipe thread compound, rather than Teflon tape. Apply the pipe thread compound to the threads of the male adapter and screw it all the way into the spigot, using a pipe wrench, if necessary, to make sure it's screwed all the way in.
- Using a ¾" spade bit, drill a hole in the interior wall, where the water line will pass through the wall to the outside. Continue drilling until you have also made a ¾" hole in the outside wall. It's easiest to do it this way, since otherwise, you could have a hard time figuring out where to drill the hole in the exterior wall.
- Now take your drill outside, where you will see the ¾" hole in the exterior wall. Using a 1" spade bit, enlarge the hole in the exterior wall to 1".
- Take a stick of CPVC water line and attach it, without gluing, to the male adapter that you have threaded onto the spigot. Go outside the house and push the line through both the exterior and interior holes in the wall. Keep pushing until the spigot is flat against the side of the house.
- Go back indoors and make a mark on the water line to show you where you will cut it. This line needs to be about ¾" past the interior wall. This extra stub is so you will be able to attach a fitting to it.
- Cut the stick of CPVC where you made your mark. Now you have a short piece of CPVC pipe that is just the right length to pass through the wall, with a little extra to receive an elbow fitting. Using CPVC primer/cleaner and cement, attach this short piece of CPVC to the male adapter. It is a good idea to cover the area in which you will be applying primer/cleaner and cement with a thick layer of newspapers. Primer/cleaner, especially, will stain anything it touches. You will never get the purple out of the linoleum, if some gets splashed on it.
- The way you glue CPVC together is to first apply the primer/cleaner to about ¾" of both the end of the stick of CPVC and to inside of the female coupling that will receive it. The primer/cleaner makes these surfaces tacky, so they will hold the CPVC cement (glue) better. After allowing the primer/cleaner to dry briefly (you can blow on it), apply the CPVC cement to both ¾" of the end of the stick of CPVC and the inside of the female coupling. Now push the end of the CPVC pipe into the coupling, pushing and turning it a little, to make sure it goes all the way in.
- Now, directly below the hole in the interior wall, drill a ¾" hole in the floor.
- Go outside the house and push this assembly (small piece of CPVC pipe, male adapter, spigot) through the wall until the spigot is flush against the wall. Screw the spigot to the exterior wall.
- It's pretty obvious what you do from here: Put an elbow on the little bit of CPVC pipe sticking out of the interior wall, put a stick of CPVC through the hole in the floor (after first dry-fitting it into the elbow), crawl under the house and make your mark for a cut on the vertical pipe, and come back indoors, remove the CPVC stick from the elbow, and cut it to the right length. Poke it back through the hole in the floor and, using primer/cleaner and CPVC cement, glue the vertical line into the elbow—and, of course, the elbow to both the line coming through the wall and the line going through the floor.
- When you get to this point, the situation should look like Figure 3.
- Now all you have to do is crawl under the house, fit an elbow to the vertical length of CPVC, and measure a stick of CPVC so that it ends just below where it needs to come back up above the floor through a ¾" hole you have drilled. Maybe this hole is under the kitchen sink, bathroom sink, or near the water heater or washing machine.
- The easiest way to figure out how long the horizontal piece of CPVC traveling under the floor needs to be is this: Poke a stick of CPVC through the hole in the floor where you have planned for it to emerge. Then, once you are under the house, you will be able to dry-fit one end of your stick of CPVC into an elbow at the bottom of the line from the spigot. Then holding this stick of CPVC horizontally, you can see where it will meet the stick of CPVC you poked through the floor. Make your mark on the horizontal piece, to show where you will cut it.
- Back indoors, cut this piece to the right length and dry fit an elbow to one end of it. Now you can crawl back under the house, taking the cans of primer/cleaner and CPVC cement with you. Glue one end of the stick of CPVC into the elbow you have already glued to the line going to the spigot. As you are doing this, now glue in the elbow at the other end of this line so it winds up facing upward, because that elbow will receive the vertical piece of line that you poked through the floor.
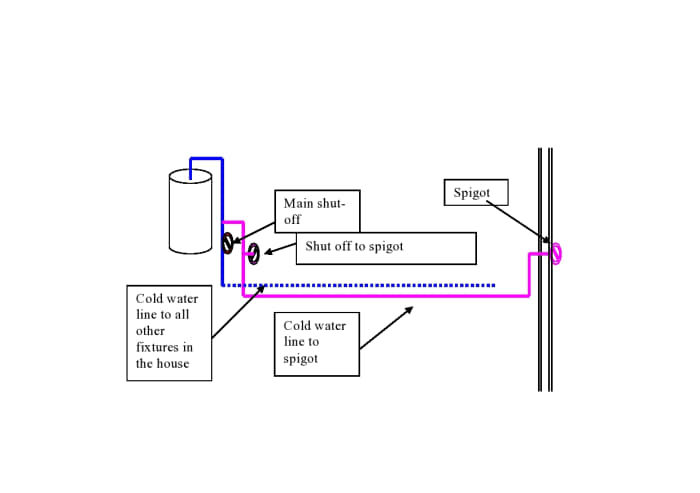
Figure 5. This is how things will look if you splice the new line in at the water heater.
So you can see that all you have to do is start from the spigot and run a water line under the floor. Then you bring it back above the floor again, at a point where you can tie it into the house's cold-water line. Here, I've shown the water line to the spigot coming above the floor near the water heater and spliced into the cold-water line that runs into the water heater, but this line could equally easily be brought into the house under the kitchen or bathroom sink and spliced into the cold-water line under either sink. You will probably decide to bring the line from the spigot above the floor and into the house at whatever place is closest to your new spigot.
So how do you splice the water line from the spigot into an existing cold-water line? After you have decided where the line from the spigot will join an existing cold-water line, you will have to make a cut in the existing cold-water line at the point where you wish to join the two lines.
Say it's under the kitchen sink.
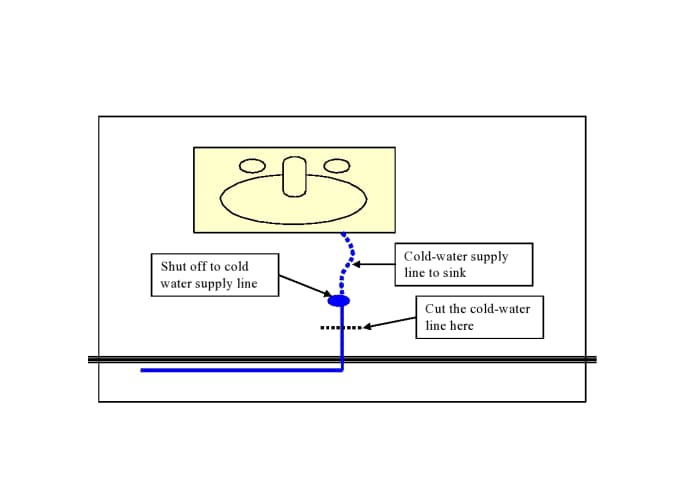
Figure 6. If you are slicing the new line in under the sink, here is where you will make your cut.
After turning off all water to the house, run water from the taps until the water stops running to drain the lines.
There will still be some water in the lines when you make your cut, but it will not be water under, say, 60 psi of pressure, so water will trickle from the cut line, rather than spraying all over the place.
The easiest tool to use to cut CPVC pipe in tight spaces is a jigsaw, although you may want to purchase a special tool for cutting CPVC at the hardware store, for use in tight spaces.
Now that you have made your cut to the existing cold-water line, you are ready to splice the water line to the spigot into it. To do this, cut the existing cold-water line where you want the new line to join it. Glue a T coupling into the cut line, as shown in Figure 7.
Since you made a cut in a line with some water in it, these pipes are probably wet. Dry them with a cloth or paper towels before applying primer/cleaner and cement.
Use primer/cleaner and glue as before, when connecting CPVC lines to couplings.
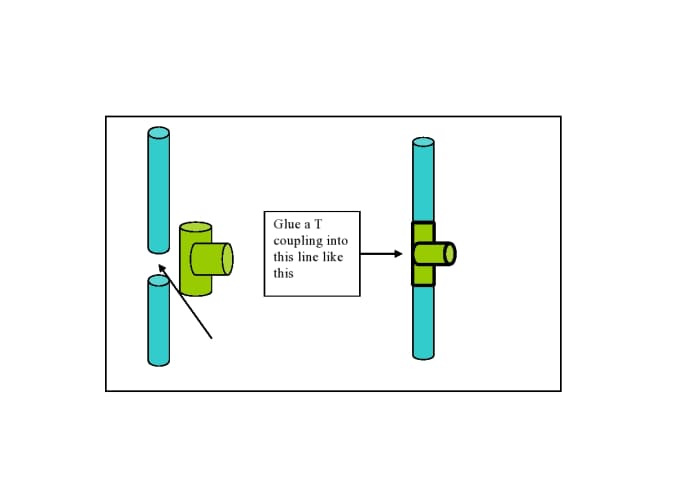
Figure 7. After cutting an existing cold-water line, glue a T coupling into it, to receive the end of the new cold-water line to the spigot.
Now all you have to do is connect the line you ran from the spigot back up through the floor to this T coupling. But first, put a shut-off on this line, as shown in Figure 8.
Since the shut-off has female threads at each end, thread a male adapter into each end, after applying pipe-thread compound to the male threads of the male adapters. Next, glue the whole thing together with CPVC primer/cleaner or glue as shown in Figure 8. The final step is to glue the end of the CPVC line into the T coupling, thus joining the new spigot line to the existing cold-water line.
Now you're done.
This is a good time to look over all lines carefully to make sure you didn't forget to glue a spot.
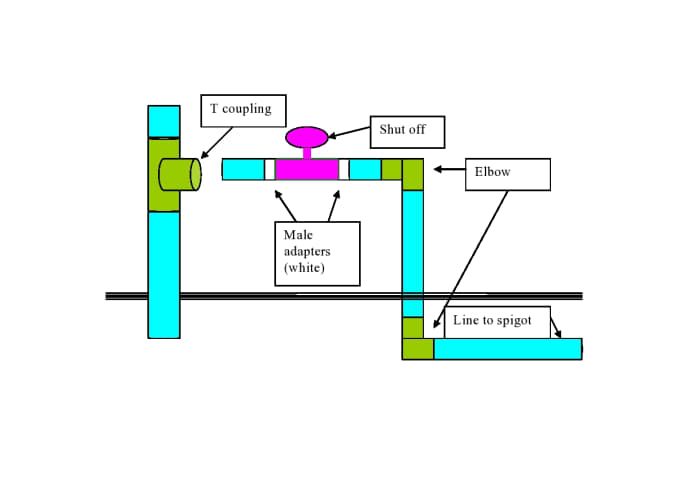
Figure 8
This is how the fittings are assembled, ready to be glued into the T coupling. Once you've assembled this line, including a shut-off with male adapters at each end, all you have to do is glue the pipe into the T coupling in the existing cold-water line.
Before Turning the Water On
How long should you wait for the glue to dry before turning the water back on? Most authorities say you should wait 24 hours for the glue to dry before turning the water back on. In actual practice, however, one hour is sufficient.
Before turning the water back on, make sure the shut-off to the spigot line is turned to the "on" position. Then go outside and make sure the spigot itself is turned off.
Turn the water back on at the main shut-off after the glue has had about an hour to dry. Have a look at all the lines both above and below the floor, to make sure there are no leaks.
It is not exactly impossible that you missed a spot. Recall that, "Plumbing doesn't happen without cussing." If there are leaks, just turn off the water at the main shut-off and glue the spot you missed. Be sure to dry the pipes and fittings with paper towels or a cloth before gluing a missed spot. Now you have to wait another hour for the glue to dry.
After you have examined the lines, and they are tight and dry, go outside and turn on the spigot.
You can be pretty sure you will have water running there.
This article is accurate and true to the best of the author's knowledge. Content is for informational or entertainment purposes only and does not substitute for personal counsel or professional advice in business, financial, legal, or technical matters.
© 2014 Sharon Vile
Sharon Vile (author) from Odessa, MO on January 02, 2015:
Interesting! A check valve sounds like a good idea for the reasons you mentioned, and it looks like a check valve is an easy and inexpensive device that simply screws onto the spigot before the hose is attached. (The web page I viewed quoted the price of such a check valve as only $4.33!.) Obviously, you don't want stagnant water that has been sitting in your garden hose, often in the hot sun, to backwash into your home water lines. You can get the same backflow situation if you leave a hose-type showerhead or attachment immersed in water in your sink, tub, or shower. The water it is sitting in can backflow into home water lines. Many years ago, I knew a guy who worked for Poison Control, and he told me a story about this. He was doing a bit of detective work trying to find out why people in a particular apartment building were becoming ill. It turned out that one of the tenants left a hose attachment to her bathtub immersed in dirty water (in which she soaked used diapers), which was being sucked into the building's water supply.
Eugene Brennan from Ireland on December 31, 2014:
Interesting, useful and voted up!
It's also a good idea (and probably required by regulations) to include a one-way (check) valve in line with the outdoor spigot. This prevents dirty water siphoning back into the indoor supply if for instance a hose is attached and the water in it becomes stagnant.
Sharon Vile (author) from Odessa, MO on April 13, 2014:
No one goes into the plumbing aisle if they don't have to, so it's a well-kept secret.
Suzanne Day from Melbourne, Victoria, Australia on April 13, 2014:
Sounds good - I have not investigated the magical properties of PVC!
Sharon Vile (author) from Odessa, MO on April 12, 2014:
Plastic pipes--PVC and CPVC--have endless possibilities. The pipe is good to use for tomato stakes--and a LOT cheaper. A person could build a nice arbor or trellis with this stuff, or use it to make "teepee" type supports for pole beans, or you could build curved supports for garden row covers. (It's rather flexible.) If I remember right, I think a ten-foot stick of half-inch CPVC is about $3. PVC is a little cheaper. Fittings are around 25 cents. Cheap and interesting materials just to play with.
Suzanne Day from Melbourne, Victoria, Australia on April 12, 2014:
Thanks for the info, maybe a hub on the naughty bits of plumbing might be interesting to try? Could be a viral one!
Sharon Vile (author) from Odessa, MO on April 12, 2014:
You'd be surprised how easy plumbing is--at least if you are using plastic pipes. One of my daughters installed a pump when she was sixteen. All by herself--except for advice from the guy who sold us the pump. Beginners do often have long conversations with the guys in the plumbing aisle.
I never really thought too much about the sexuality of my fittin's. There is actually a fitting called a nipple--but I think that's just on gas lines. One of my old construction buddies once told me a story about how a lady client got very offended and upset when mentioned "the nipple." I think she thought he was deliberately using an offensive choice of words. This same buddy always referred to pipe insulation as "donkey dick"--which actually is a deliberately offensive choice of words. (Have a look at it some time.)
The woman who taught me plumbing had such a broad Louisiana accent and used so many funny expressions, I couldn't understand her half the time.
Thanks for looking at this article! It is not one of my more successful hubs..
Suzanne Day from Melbourne, Victoria, Australia on April 11, 2014:
Hi blueheron, this is very practical and useful information. I must admit it is a little over my head but that would soon be corrected if I needed to install a spigot! Having a little chuckle over the male and female parts (why were they invented, instead of using unisex parts?) and thank you for a very useful hub.
Source: https://dengarden.com/home-improvement/How-to-Install-an-Outdoor-Spigot-for-Watering-Your-Garden
0 Response to "Add a Water Spigot to Line Easy"
Post a Comment